Creating your gosadi account
hey, welcome to gosadi!
Let’s get you set up with your gosadi account. This will be your portal to all things gosadi. The following guide will walk you through the process of creating your gosadi account, signing up for your subscription, personalizing your profile, and adding your social media links
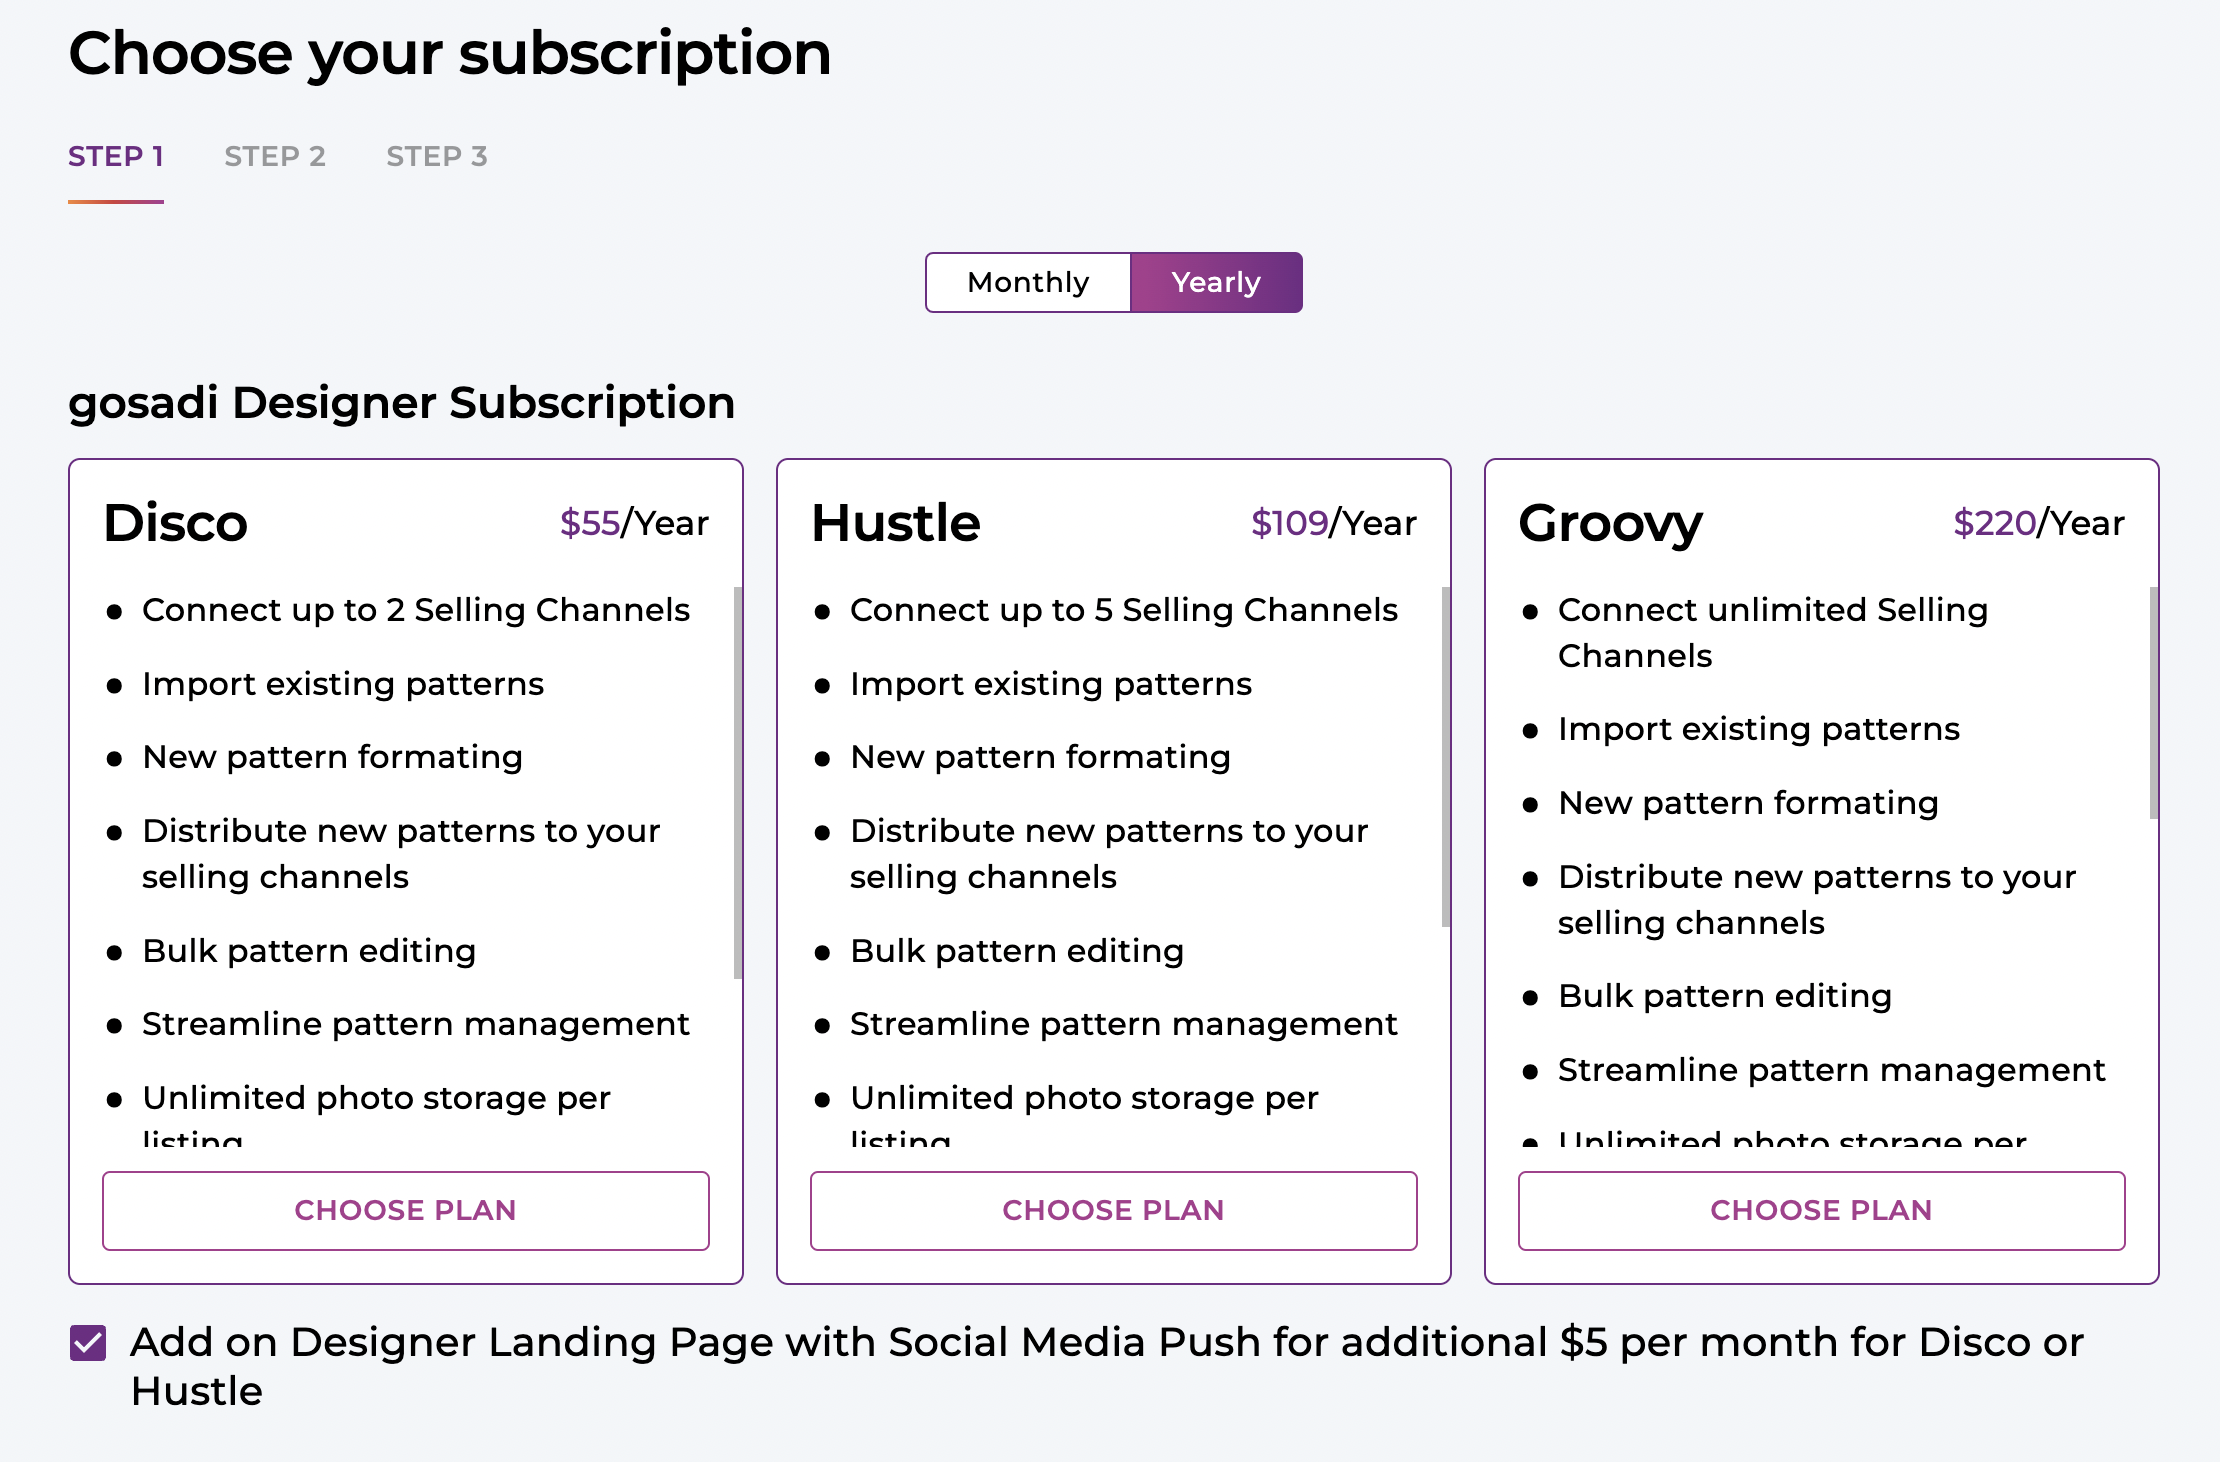
Step 1: Select your subscription
Click “Create Account”
Select the field marked YEARLY
Check the Designer Landing Page add-on option
(located under the tiers list)
Click CHOOSE PLAN for the DISCO tier
Step 2: Fill in your account information
After selecting CHOOSE PLAN, on the next screen, fill out & Create Account
(Enter your real information here, including your real phone number, country, & postcode)Leave the box for approval of receiving promotional emails checked.
(if this box was unchecked, please take a screenshot & send it to us)
Step 3: Payment
Enter your payment information here
Information you will need for payment:
Please use your name for the credit card name & enter the below information for the rest of the fields.PLEASE DON’T USE YOUR REAL CREDIT CARD.
Cardholder name: Use your name
Card #: 4242424242424242
Exp: 01/24
CVC: 123
Zip Code: 10001Confirm that you have checked the “BILL ANNUALLY” subscription option
Click “PAY NOW”
Step 4: Connect Ravelry - your first Selling Channel
There are two ways you can complete this step. A pop-up should appear when you click CREATE ACCOUNT. Click on the CONNECT CHANNELS button on the pop-up.
However, if you missed this step or if the pop-up did not appear, you can head to the Selling Channels tab on the left-hand side of your screen.
Under Ravelry, click CONNECT!
You will now need to give gosadi access to your Ravelry in order for you to be able to work on your patterns through the gosadi platform.
You MUST select the check box for pdf access
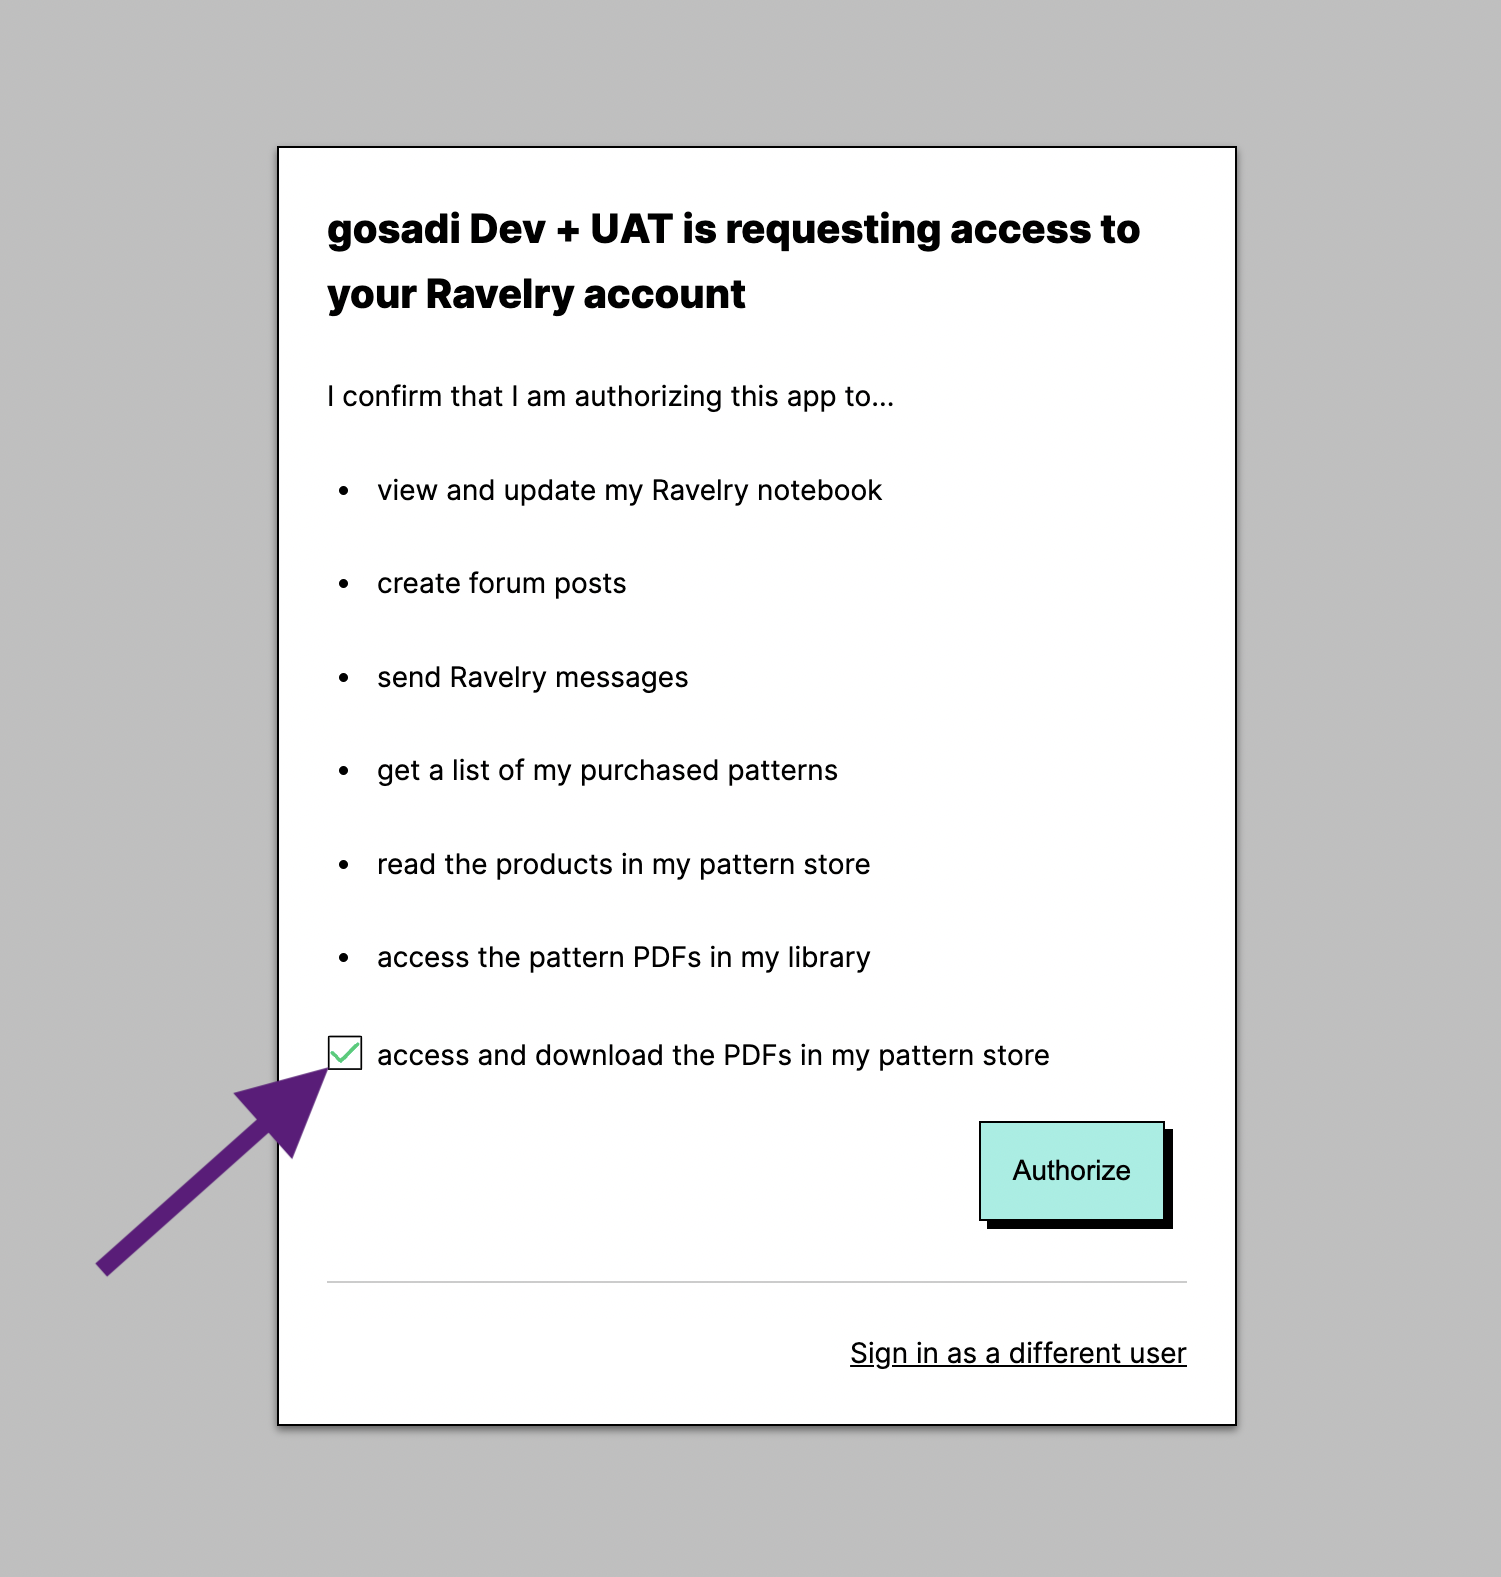
4. Click to authorize gosadi Dev + UAT (user access testing environment)
You should receive a confirmation email at this point. Please save that email for future survey steps.
Learn more about the process of connecting your Ravelry account HERE.
Step 5: Personalize & set up My Account
Click on the gosadi fan in the top left corner to open the side menu to open and close menu.
Click My Account
Click Account Profile
Here you’ll fill in your account information!
Take note, did your information autofill correctly based on the previous steps?
When you have filled out your Profile with your correct information, business name, gender, & pronouns click SAVE CHANGES!
Please upload a profile picture.
Try to center or crop your uploaded photo.
Next, swap your picture around at least twice by choosing the option to have a gosadi color & Initial as your profile picture.
Once you have swapped your profile picture around a few times you can change it to whichever version you like best and leave it as such.Click SAVE CHANGES!

Step 6: Let’s get social!
You can now add links to your social media pages for people to follow you and see your accounts
(This will be visible on your designer landing page as well as on your community profile later).
Click Social Links
Enter your social account URLs into the appropriate fields
Click SAVE CHANGES

Additional note to gosadi ALPHAs:
We want you to now upgrade your account to HUSTLE. You can do this by clicking My Account followed by clicking on Subscription.
Then click the Upgrade Plan button under the HUSTLE tier. A pop-up will appear and you will click the upgrade now button.
An additional reminder, this is a live build. Please stick to the steps laid out in the testing process & as tempting as it might be, we ask that you only access the parts of the site that have been shared with you.
When you have completed these steps, please complete this week’s survey.