Updating Pattern Names in gosadi

When managing your online library, ensuring accurate data transfer is crucial. In this support article, we're breaking down how gosadi SMARTS! handles the Pattern Name field during an Etsy import. This guide will provide you with clear insights into how SMARTS! ensures your data remains precise and reliable, making your inventory management smoother and more efficient.

Distinction Between Pattern Level and Selling Channel Level Changes

Before we jump into how SMARTS! works, it's important to understand the distinction between pattern level updates and Selling Channel level updates.

pattern level updates

At the pattern level, gosadi’s SMARTS! technology is responsible for ensuring that your pattern details are accurately reflected in the core Pattern Details of your library and across all Selling Channels.

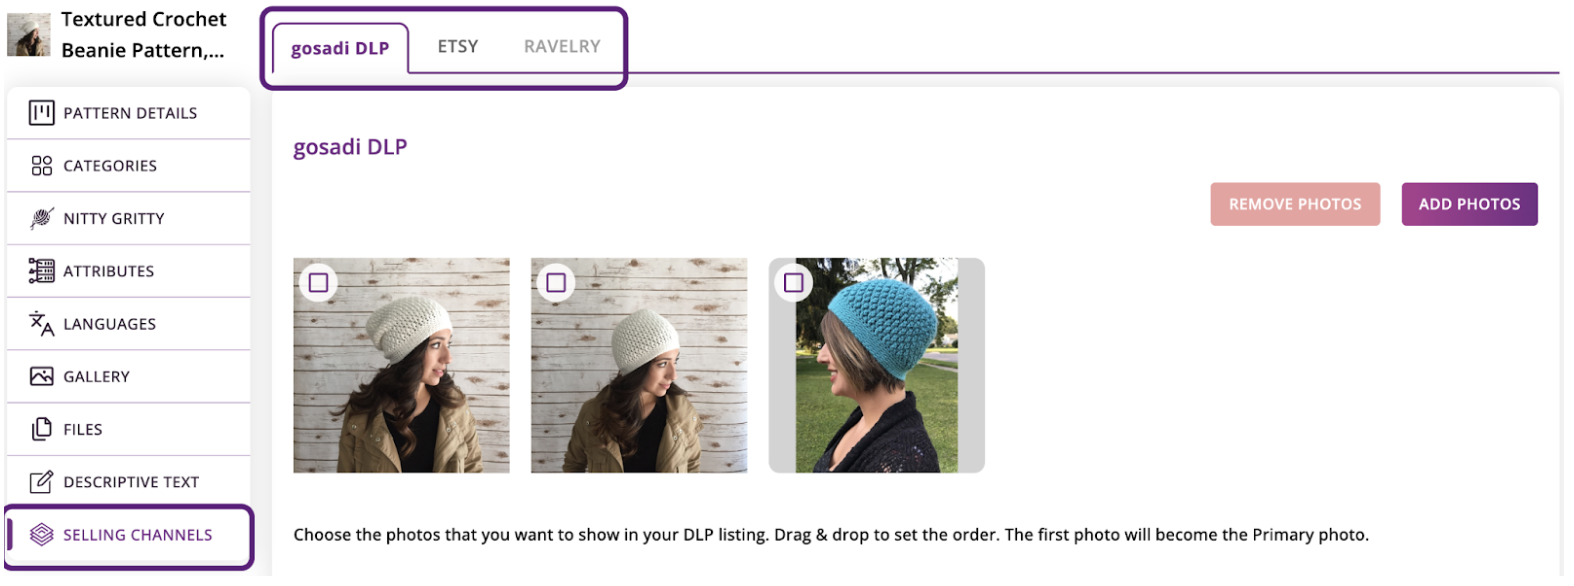
selling channel level changes

In contrast, Selling Channel level changes refer to how your patterns are displayed on connected platforms, such as Etsy. Each pattern in gosadi includes a dedicated tab for each connected Selling Channel, allowing for specific control over how your products appear on these external shops.

Understanding gosadi SMARTS!

At the heart of gosadi's efficiency is SMARTS!, our sophisticated AI powered tool designed to facilitate seamless data imports from Etsy. Unlike a direct one-to-one data transfer, which is not supported in Etsy, SMARTS! intelligently navigates through your pattern details on Etsy, ensuring your pattern details are accurately reflected in gosadi. This system not only streamlines the import process but also maintains the integrity of your product information, adapting to the unique format of Etsy's data fields.

Populating the Pattern Name Field

In gosadi, the Pattern Name field is crucial for effective inventory management to quickly and easily identify items in your library. During an Etsy import, gosadi's SMARTS! plays a pivotal role in populating this field. It begins by examining the name of the Etsy file(s) imported. SMARTS! then searches for a corresponding match in two key places within Etsy's data: the title field or the product description. If a match is found in either of these locations, SMARTS! validates this match and populates the Pattern Name field in gosadi accordingly. This meticulous process ensures that the names of your patterns are accurately transferred and consistently represented across your gosadi inventory.

However, if SMARTS! cannot find a matching name, the Pattern Name field in gosadi is left blank. 

In such instances, gosadi provides a fallback mechanism by displaying the Etsy Title under the Etsy Selling Channel tab within your pattern in the Product Library view. This serves as a reference point for you to manually update the Pattern Name in the Pattern Details section.

Etsy Title Not Populated in Pattern Details:

Etsy Title Populated in Selling Channel:

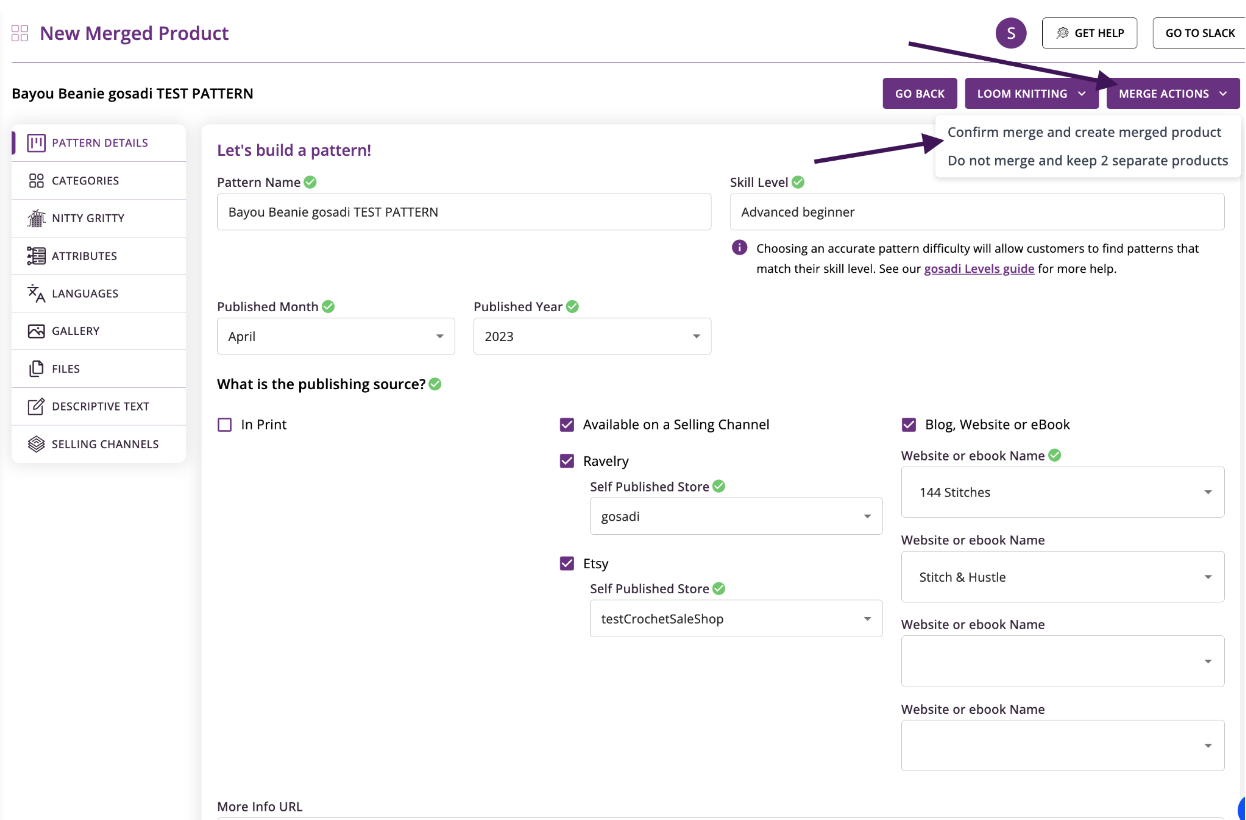
In the case that your Pattern Name matches an existing pattern in your library, gosadi SMARTS! Will add the phrase “On Etsy” to the end of the Pattern Name to identify that you have more than one of the same pattern and this is the one on Etsy. This is a case where you want to Merge,

Updating Pattern Names in gosadi

When the Pattern Name field in gosadi isn't automatically populated from an Etsy import, you have the flexibility to either assign a new name to your pattern or match it to the Etsy listing.

option 1: assigning a new name

If you choose to give your pattern a new, unique name that differs from the Etsy listing:

Enter the new name in the Pattern Name field in the Pattern Details section and be sure to save your changes

You must also make sure that you are using a new name, and there is no pattern with that name in your library. Gosadi prevents multiple patterns with the same name, as aligned with our best practices.

option 2: matching to the etsy listing

To match the Pattern Name with what appears on Etsy:

  1. Use the Etsy Selling Channel Tab for reference.

  2. Manually update the Pattern Name in the Pattern Details section to match the Etsy title.

  3. Save & Continue

Final Thoughts

Managing your inventory effectively in gosadi, especially when importing from Etsy, revolves significantly around the accurate population and maintenance of the Pattern Name field. gosadi's SMARTS! technology plays a critical role in automating this process, ensuring that your patterns are accurately named and consistent with their Etsy listings. However, in instances where SMARTS! cannot make a match, the flexibility to manually update or assign new names to your patterns becomes essential.

Guide to Merging Patterns in gosadi

The great thing about gosadi is that it allows you to manage your online offerings from a central hub. No more jumping from one Selling Channel to the next, and this saves you time. But we also go a step further by not just giving you a pattern catalog hub, but also a way to manage patterns in your library in a single spot even though they are available on multiple channels. 

As a designer, you might often face the challenge of managing duplicate patterns when you import your designs from various selling channels into gosadi's Product Library. This support article will guide you through the process of merging these duplicates, ensuring your Product Library is organized and up-to-date.

Step 1: Identifying Duplicates

Initial Onboarding

When you first connect multiple Selling Channels (like Ravelry and Etsy) to gosadi, it's common to encounter duplicate patterns in your Product Library.

Initiating the Merge

  1. Navigate to the Product Library

  2. You will notice that gosadi detects duplicates and adds the extension (on Etsy, on Ravelry, etc) to let you quickly know you have that pattern in more than one location as well as identify which location that listing is for.

  3. Click on "Initiate Merge". gosadi will start processing your patterns to identify matches.

  4. Note: this may take a few minutes as gosadi SMARTS!™ runs.

Step 2: Accessing the Merge/Link Center

Finding the Merge/Link Center

After the processing, a new option labeled "MERGE / LINK CENTER" will appear under the Product Library section.

Understanding the Merge Screen

The Merge/Link Center is divided into two sections:

Top Section: Displays patterns matched with high probability.

Bottom Section: Shows patterns with lower probability matches.

Step 3: Selecting Patterns to Merge

Choosing Patterns That Match

Check the boxes next to the patterns you identify as the same but on different Selling Channels.

Initiating Merge

  1. Click on the "Merge" button to proceed.

Step 4: Resolving Conflicts Between Selling Channels

Review Conflicts

The next screen will present all the conflicts that exist between the different Selling Channels.

Making Selections

Carefully select the values that should remain post-merging. Remember, some fields like Gauge and Needle Size allow you to select multiple values and which is primary.

Selecting Primary Values

If you select multiple values for a field, you'll also need to designate a primary value.The primary value determines the display order, with the primary listed first.

Merging Your Descriptive Text

You have the option to select which of your stylized text you want to appear across your Selling Channels. If you select a Selling Channel text (in this case, Etsy or Ravelry) then THAT text will populate across the product level to all Selling Channels for that product.

Selecting Do Not Merge on Descriptive Text

When selecting a Descriptive Text value you have the option to “Do not merge”. This will allow each Selling Channel to maintain its pattern description. If you have a DLP gosadi SMARTS! will generate the description on your gosadi DLP tab.

Step 5: Previewing and Finalizing the Merge

This is your opportunity to tidy up your product listing and make final edits. It is the same as Housekeeping, but for the merged product. Make any final changes and tweaks to make sure your product listing is how you want it to look across all your connected Selling Channels.

Previewing the Merged Product & Performing Housekeeping

Click on "PREVIEW MERGED PRODUCT" to review the details of your merged patterns.

Reviewing Details

  1. Review Merged pattern: Take a moment to review each tab and verify the details. 

  2. Update details on each screen as you move through to finalize your listing

  3. Remove Duplicates: In the 'Files' and 'Gallery' tabs, you'll find duplicates because gosadi combines files and photos from both original patterns for completeness. We recommend removing any duplicates.

  4. Update Selling Channels: After removing duplicates, you may need to update one of the 'Selling Channels' tabs. This step is necessary because deleting duplicates might have removed files/photos linked to your Selling Channel. Re-add the final version of the pattern to ensure it syncs to your store.

Step 6: Confirming the Merge

Final Step

  1. Once you’re satisfied with the preview, navigate to "Merge Actions" and select "Confirm merge and create merged product."

  2. You will be asked to Confirm Merge & Sync.

    The reason you must sync when you confirm your merge is to ensure that all details are consistent and fully updated across your Selling Channels for that product.

Your patterns will be merged, and they will no longer appear as separate patterns in your Product Library.

You will also notice, on the new merged product, in your library that all Selling Channels appear for that product.

Final Thoughts

Merging patterns in gosadi is a straightforward process that ensures your Product Library remains organized and efficient. By following these steps, you can easily manage your designs and focus on your creative work. 

To explore all the features and benefits that gosadi has to offer, visit our website today!

Importing Pattern Files From Etsy

Maintaining an organized shop and ensuring your customers have access to the latest versions of your patterns is essential to your success as a designer, and gosadi is taking pattern management on Etsy to the next level! In this article we'll walk through the process of adding and syncing PDFs through gosadi for a seamless and efficient Etsy experience.

Understanding How Etsy Files are Managed on gosadi


You may notice that when viewing your pattern PDF in gosadi, it shows “File located on Etsy”, rather than the PDF itself. This is due to how Etsy manages files upon import.

When you import your patterns to gosadi from Etsy, the original PDF file remains in Etsy. Therefore, any updates or changes you make to the pattern within gosadi are independent of the original Etsy file. Your Etsy shop will continue to reference the original PDF until you sync a new file through gosadi. You can add any updates you want to the pattern and new pdfs through gosadi and the original file will remain on Etsy until you sync a new file through gosadi. 

Updating and Adding New PDFs

A benefit of gosadi is that it allows you to add updates and upload new PDFs to your patterns directly within the platform. You don't need to worry about manually managing files on Etsy. To manage your Etsy PDFs on gosadi:

  1. Navigate to the Product Library and select the pattern you want to update

  2. Click on the Files tab and upload or remove files

  3. Be sure to Click Save & Continue

Etsy Selling Channel Tab

When you add a PDF to an Etsy pattern in gosadi, you'll notice an option on the Etsy Selling Channel tab that allows you to decide whether or not to include that pattern in your Etsy Sync.

Here's what you need to know:

  • Any pattern included in the Etsy Selling Channel tab will be automatically included in your sync.

  • Only the files associated with the patterns on the Etsy Selling Channel tab will be synced with your Etsy shop.

Final Thoughts

Understanding how files are managed upon import and how to add, update, and sync PDFs  from gosadi to Etsy will help you maintain an organized shop, while also streamlining your file management process. 


To explore all the features and benefits that gosadi has to offer, visitour website today!

Creating a New Product

As a designer, showcasing your creations on various Selling Channels can significantly boost your visibility, brand awareness and sales. While importing patterns is a great start, creating new products in your gosadi Product Library opens up even more opportunities to be efficient and reach bigger audiences. In this article, we'll guide you through the process of creating a new product on gosadi, from choosing your craft type to publishing it on your desired Selling Channel. Additionally, we'll explore how you can easily manage multiple Selling Channels from a single gosadi listing set up.

How do I create a new product?

To begin creating a new product on gosadi, follow these steps. Remember to click “SAVE & CONTINUE” as you move from one page to the next:

Step 1: Access "Manage Product" and Click "Create Product"

Log in to your gosadi account, navigate to "Manage Product," and click "Create Product" to start the product creation process.

Step 2: Choose Your Craft Type

Select the appropriate craft type that best represents your product. This forms the foundation for your creation.

Step 3: Fill Out Pattern Details

In the Pattern Details tab, provide essential information about your pattern, including Pattern Name, Pattern Level, Published Month & Year, and identifying where your pattern is published, this includes identifying available Selling Channels. Lastly, complete the "More Info URL" field to add a link with additional details. 

Step 4: Define Categories and Subcategories

Help potential buyers find your product easily by accurately defining the categories and subcategories that best describe your pattern. You may add multiple categories and enter custom sub categories.

Depending on what Selling Channels you connect to, this can be a powerful way to get found by people looking for patterns.

Step 5: Provide Detailed Information

In the Nitty Gritty tab, offer precise details about your pattern, such as yarn weight and hook size. Fill out the Size Information box with appropriate dimensions.

Step 6: Add Attributes

Use the Attributes tab to search the attributes picklist and add relevant characteristics and sub-attributes. 

Step 7: Add Languages

Specify the languages in which your pattern is available.

Step 8: Showcase Your Product with Images

In the Photo Gallery tab, upload clear, well-lit images that accurately represent your product. High-quality images enhance the appeal to potential buyers. Add Captions/ Alt text to enhance your customer experience.

Step 9: Upload Necessary Files

Use the Files tab to upload essential files for your pattern, such as PDFs or any other related materials.

Step 10: Utilize Descriptive Text  (Optional)

The Descriptive Text tab allows you to include extra information or notes about your pattern, offering additional context for potential buyers.

Step 11: Choose Your Selling Channel

In the Selling Channels tab, select your desired Selling Channel and verify all pattern information before proceeding.

At the bottom of the gosadi DLP tab marke the pattern as “Visible on DLP” or “Hide on DLP” to determine if the product will appear on your public facing gosadi page.

Save or Publish Your Product

Once you have completed all the necessary fields, choose to either save your work as a draft or publish it directly to your chosen Selling Channel. Saving as a draft allows you to revisit and make changes before making it public.

How do I access my drafts

Click “Manage Product” and select “Product Library”, then click “Drafts” to see all products that were saved but not  published to your DLP.

Can I Edit My Product Details After Publishing It?

Yes! You can edit your product details even after it has been published. To do so, go to "Manage Product" > "Product Library" and select the product you want to edit. Make the necessary changes and save them to update your product's information. Remember to “Save & Publish” your edits when you're ready for your customers to see the changes.

Can I Manage Multiple Selling Channels Through My gosadi Account

Absolutely! gosadi allows you to manage multiple Selling Channels, such as Ravelry, Etsy, and others, from a single account. You’re able to edit a single product and push updates to each Selling Channel in isolation. This feature streamlines product and sales management across different platforms, saving you time and effort.

Final Thoughts

Creating and managing products on gosadi is a powerful tool to grow your crafting business. By following the steps outlined in this guide, you can effectively showcase your patterns and reach a broader audience through various Selling Channels. Don't hesitate to leverage the convenience of gosadi to take your crafting journey to new heights!


To explore all the features and benefits that gosadi has to offer, visit our website today!