Optimize your Pattern Pages So Makers Find Them Easier

gosadi’s mission is to save you time and help get your brand and products in front of the people looking for them.

In order for gosadi to work its magic, you’ll have to feed it your best, most optimized information.  It is important to maximize your Pattern Pages in a way that attracts more eyes (and makers) to your designs.

Optimize a Pattern Page

Your Pattern Pages showcase the details of your patterns and connect potential customers with how they can get them. Fully optimized pages mean that anyone searching either gosadi or the internet's search engines will find you and your designs much easier and faster.

A well-optimized Pattern Page contains four key pieces of information.

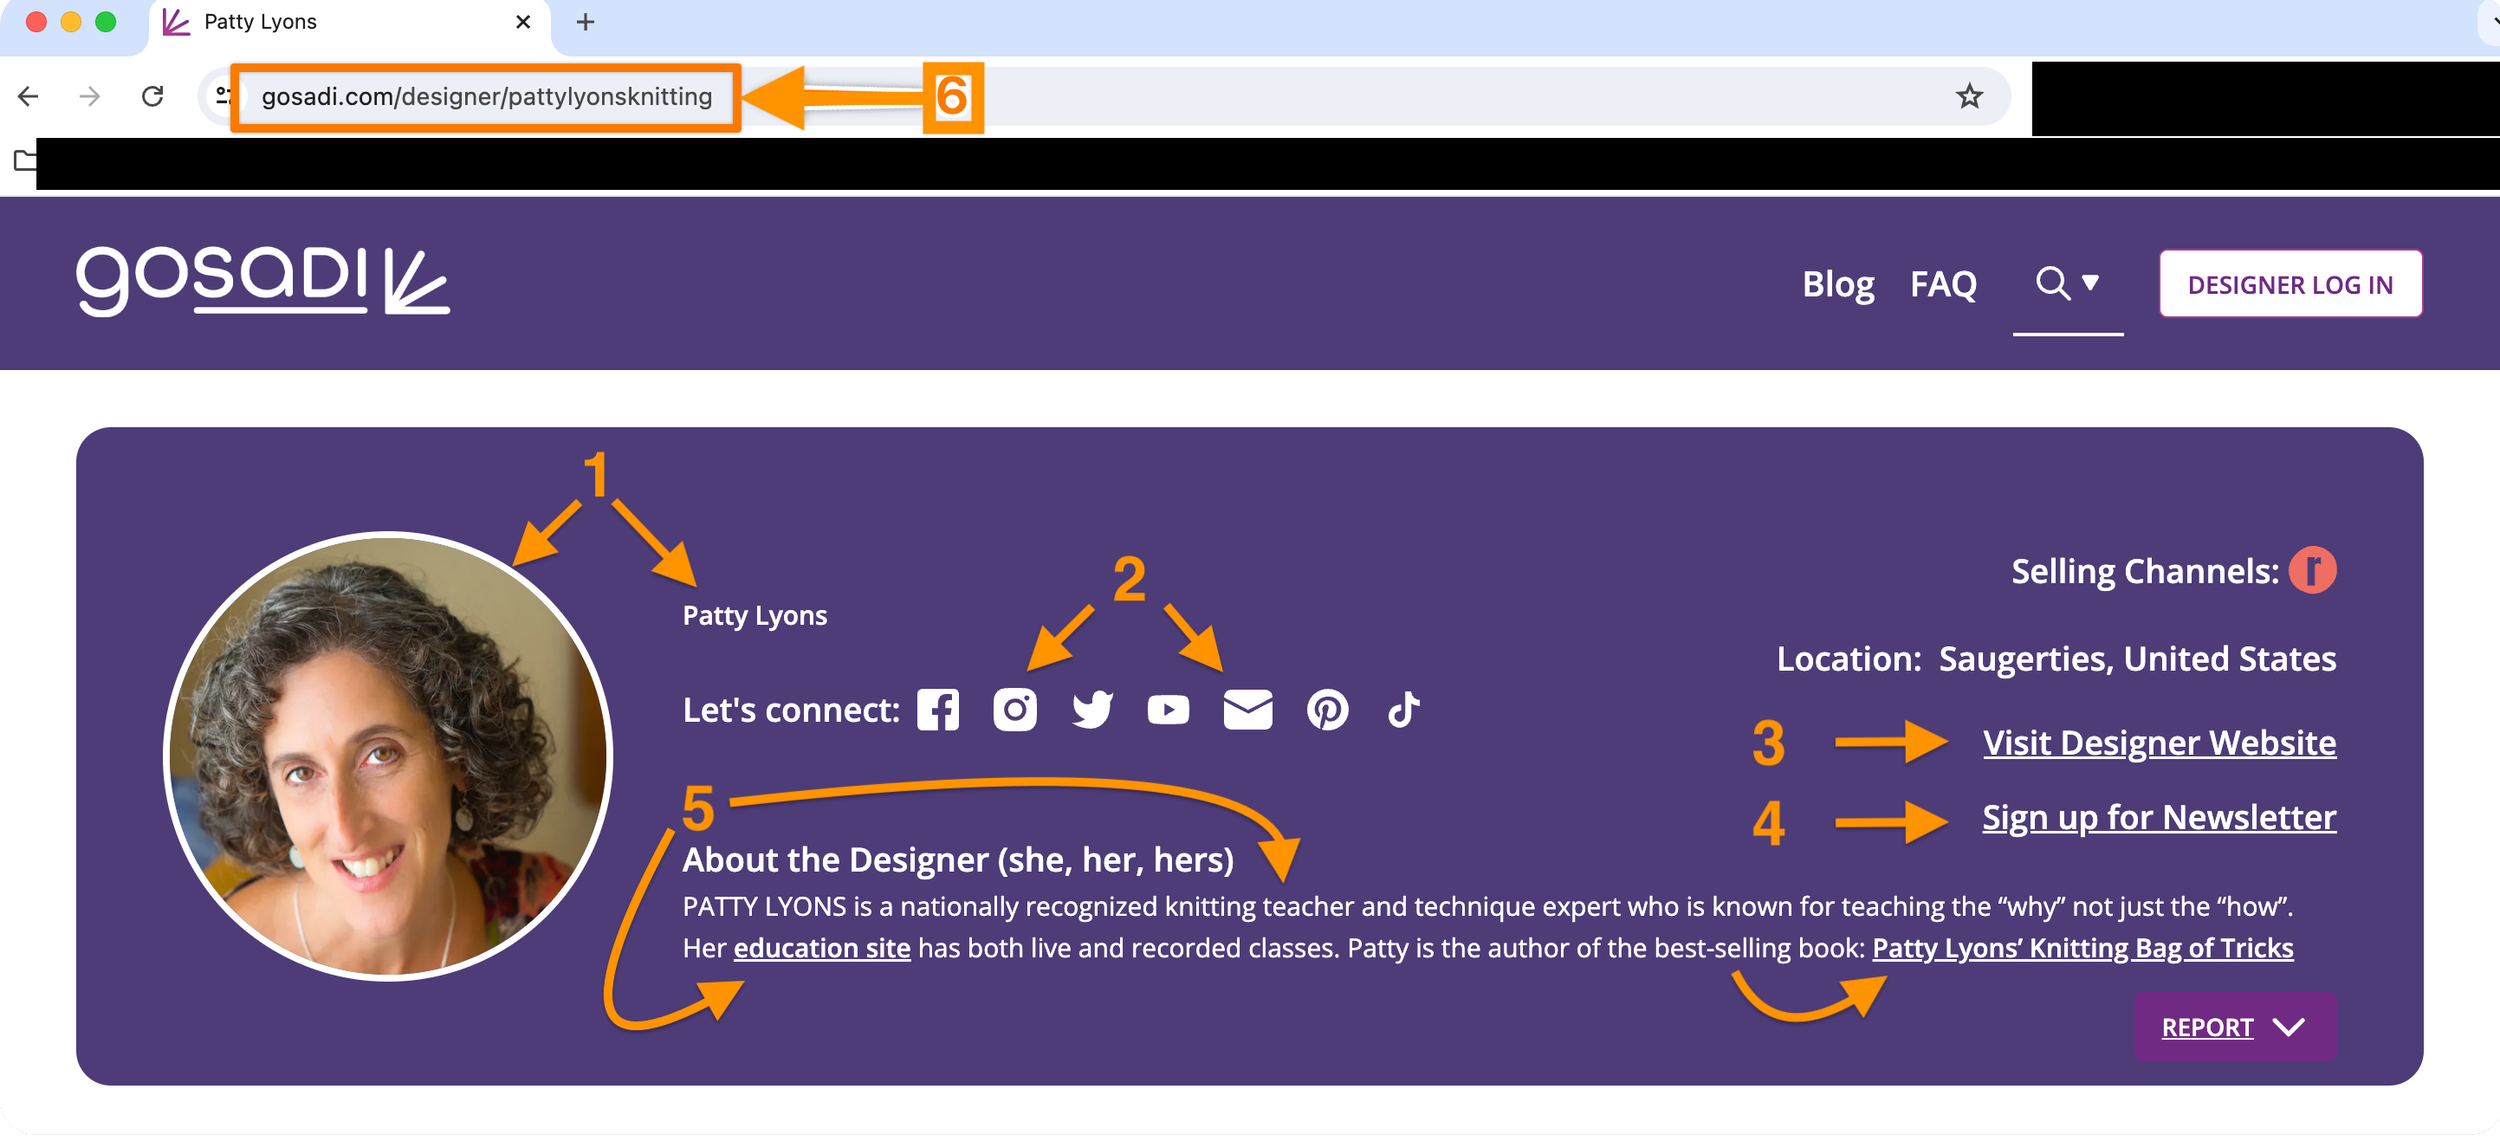
  1. Profile photo + Brand name + Designer Name

  2. Pattern Title + Formatted Description

  3. Outbound Links

  4. Brand logo and link under “Available on”

Add a Profile Photo, plus Brand and Designer Names

Navigate to DLP Profile in gosadi 
Upload a profile picture
Upload a logo
Add a Business Name

Scroll to Select Name to appear on… and choose how you’d like your Brand Name and your name to appear
*This is a great place to solidify your brand recognition. You can even customize or combine names however you want. 

Click Publish to publish to your DLP and to your Product Pages

Add Pattern Title and Format Pattern Description

When you add a title to your pattern and format your pattern’s description with bold, bulleted lists, paragraph spaces, and links, you’re providing your audience every opportunity to understand what they’re looking at and where to find more information.

You also want to use clear and relevant language optimized for SEO. gosadi SMARTS! will help you do this. 

Go to either Create Product if you’re adding a new product or to Product Library to edit an existing product

In Pattern Details, add the Pattern Name and as many details as possible on the rest of the page including your own website.

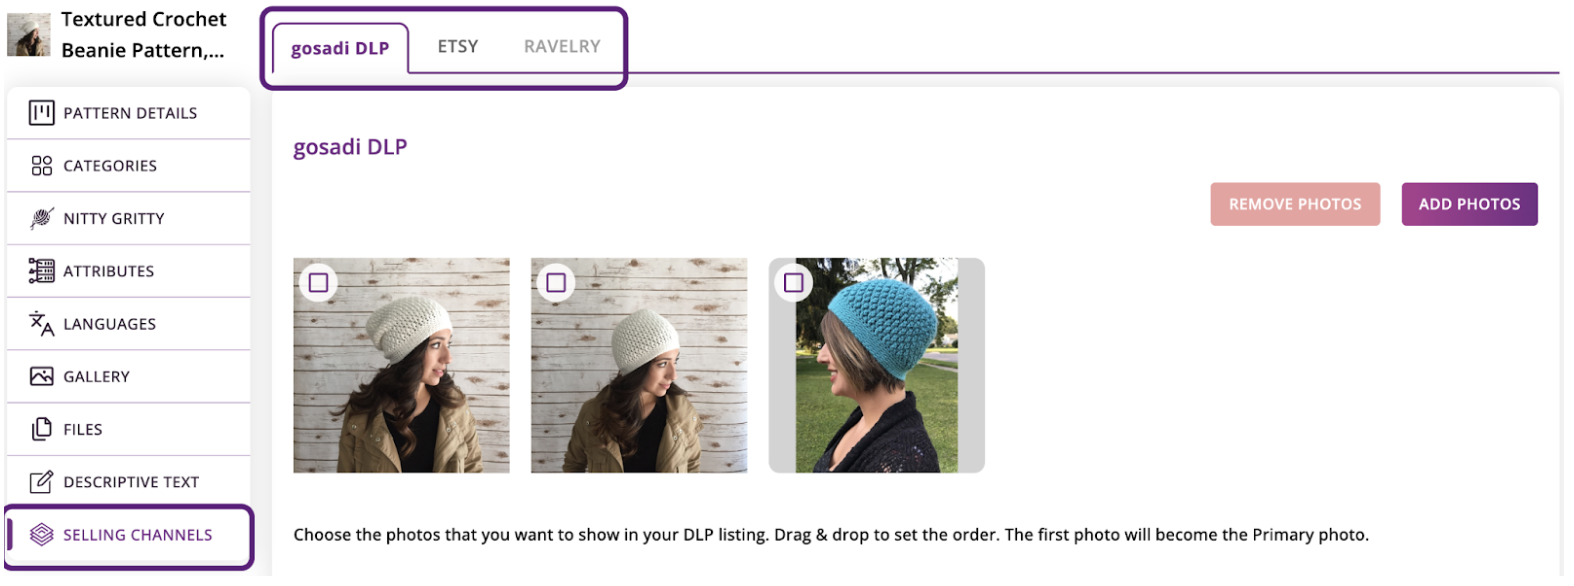
Work your way through all of the Create Product or Edit Product screens, paying special attention to the language and formatting on the Global Text and Selling Channels tabs
*Add as many details as possible so that gosadi SMARTS! can create better listing descriptions for SEO.

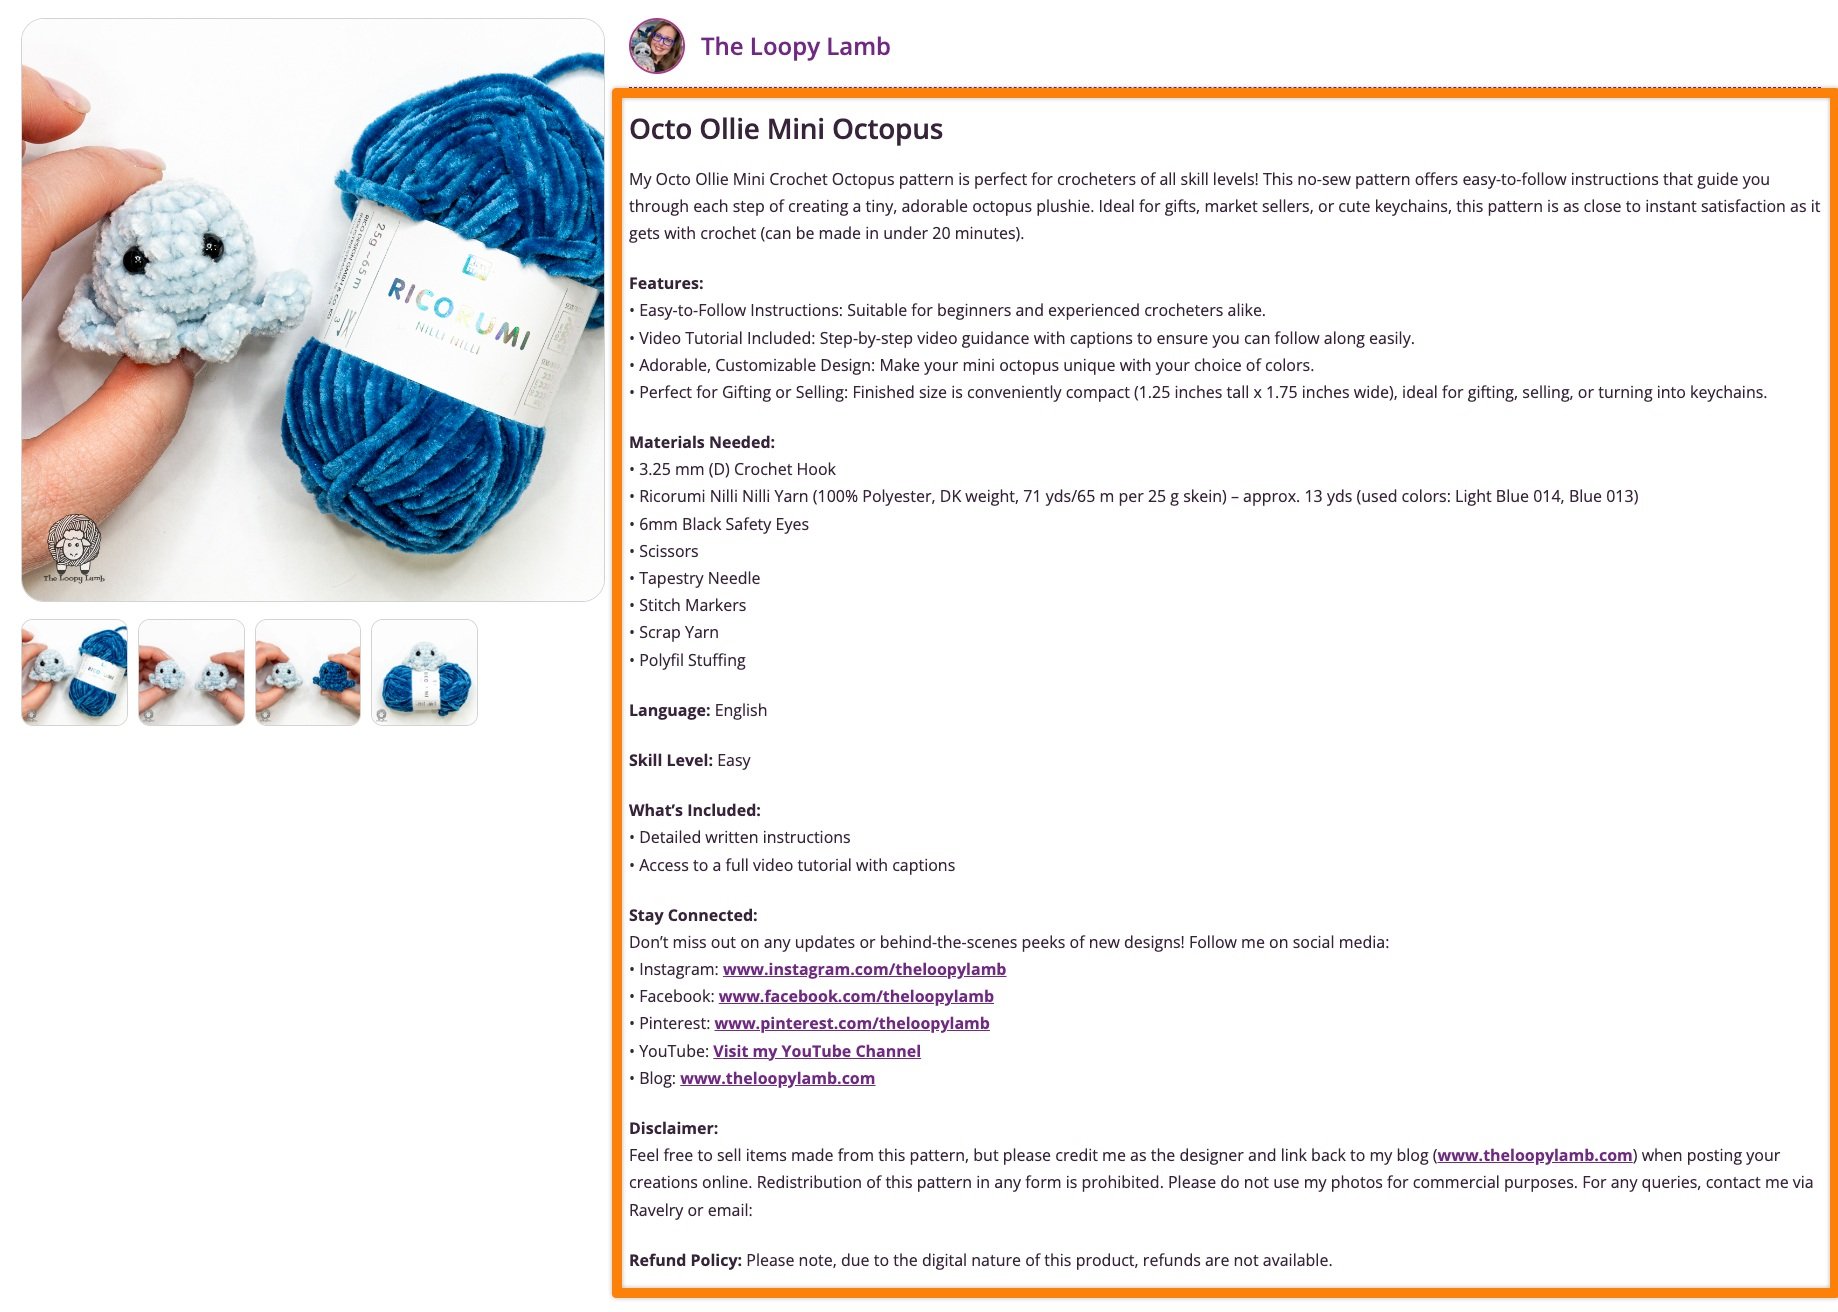
Remember to add bold, paragraph breaks, bullet points, and links to let your audience know more about the pattern, for easier readability, and how to find you elsewhere

Use this as an example for formatting your pattern’s details

Add outbound links to your Product Description

One of the beauties of gosadi is that we allow you to put as many outbound links as you want or need into your product descriptions and into your About Me bio.  We truly want people to find you.  Take advantage of it!

Sidebar: also a great place for affiliate links to earn those dollars!

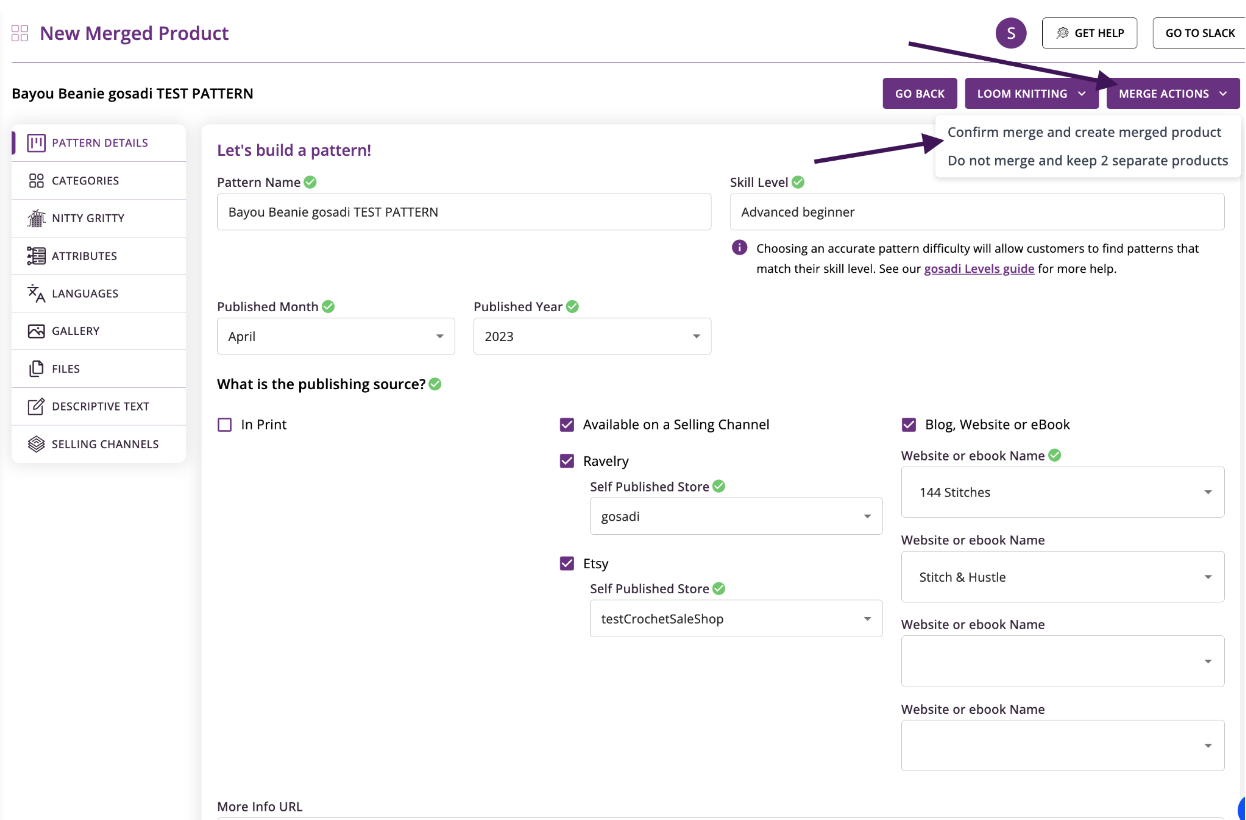
Confirm your Brand Logo and Link appear “Available On”

If your logo with a link to purchase the item does not appear at the bottom of your product page, go back to your Pattern Details tab.

Scroll down to the More Info URL at the bottom.  Add your URL for that product.

Click Save and Continue

Check your product page again.  The logo you uploaded in Step 1, plus the URL you just added should appear under “Available on” on the product page

Other helpful Optimization tips

Managing Patterns on your DLP
Hiding DLP vs Hiding Patterns
Creating a New Product
Optimize your Designer Landing Page (DLP)

Optimize your Designer Landing Page for better search and SEO

The purpose of gosadi is to save you time not just in ecommerce management, but in how you grow your customer base by directing people to you, to your website, to your products, to your Selling Channels, to your socials… to your everything!  gosadi’s mission is to save you time and help get your brand and products in front of the people looking for them.

In order for gosadi to work its magic, you’ll have to feed it your best, most optimized information starting with your DLP Profile.

Optimize your DLP

Your Designer Landing Page (DLP) is a powerful and robust feature on gosadi that showcases your brand and your offerings to a wide audience.  Because it acts as a digital landing page for you and your patterns, you’ll want it to reflect your full and complete brand identity.  

With an optimized DLP working on your behalf, anyone searching either gosadi or the internet's search engines will find you much easier and faster.

A well-optimized DLP contains six key pieces of information.

  1. Profile photo + Designer name + Brand name

  2. Social links & Contact Email

  3. Website

  4. Newsletter

  5. Bio / About

  6. Optimized URL

Add a Profile Photo, Designer, and Brand

Navigate to DLP Profile in the panel
Upload a profile picture
Upload a logo

Note:  Uploading a logo is important, since it will show up on your products’ pages under “Available on” when you put a link to a website on the pattern page at the top of the DLP selling channel tab.  Without a logo, there’ll be an empty box which doesn’t tell customers who you are or where they’re going when they click “get it here”.

Add Social Links

Scroll down to the Social Links section of your Designer Page Profile
Click on Add Social Links

Add your links
Scroll down to the bottom and click Save Changes

Add an email for your business (Note:  this can be your email, a general inbox, an assistant’s email, a support email, etc.)

Add your website

Add your newsletter

Add your bio in the About Me section

Finally, add your company’s slug to optimize your URL

Updating Pattern Names in gosadi

When managing your online library, ensuring accurate data transfer is crucial. In this support article, we're breaking down how gosadi SMARTS! handles the Pattern Name field during an Etsy import. This guide will provide you with clear insights into how SMARTS! ensures your data remains precise and reliable, making your inventory management smoother and more efficient.

Distinction Between Pattern Level and Selling Channel Level Changes

Before we jump into how SMARTS! works, it's important to understand the distinction between pattern level updates and Selling Channel level updates.

pattern level updates

At the pattern level, gosadi’s SMARTS! technology is responsible for ensuring that your pattern details are accurately reflected in the core Pattern Details of your library and across all Selling Channels.

selling channel level changes

In contrast, Selling Channel level changes refer to how your patterns are displayed on connected platforms, such as Etsy. Each pattern in gosadi includes a dedicated tab for each connected Selling Channel, allowing for specific control over how your products appear on these external shops.

Understanding gosadi SMARTS!

At the heart of gosadi's efficiency is SMARTS!, our sophisticated AI powered tool designed to facilitate seamless data imports from Etsy. Unlike a direct one-to-one data transfer, which is not supported in Etsy, SMARTS! intelligently navigates through your pattern details on Etsy, ensuring your pattern details are accurately reflected in gosadi. This system not only streamlines the import process but also maintains the integrity of your product information, adapting to the unique format of Etsy's data fields.

Populating the Pattern Name Field

In gosadi, the Pattern Name field is crucial for effective inventory management to quickly and easily identify items in your library. During an Etsy import, gosadi's SMARTS! plays a pivotal role in populating this field. It begins by examining the name of the Etsy file(s) imported. SMARTS! then searches for a corresponding match in two key places within Etsy's data: the title field or the product description. If a match is found in either of these locations, SMARTS! validates this match and populates the Pattern Name field in gosadi accordingly. This meticulous process ensures that the names of your patterns are accurately transferred and consistently represented across your gosadi inventory.

However, if SMARTS! cannot find a matching name, the Pattern Name field in gosadi is left blank. 

In such instances, gosadi provides a fallback mechanism by displaying the Etsy Title under the Etsy Selling Channel tab within your pattern in the Product Library view. This serves as a reference point for you to manually update the Pattern Name in the Pattern Details section.

Etsy Title Not Populated in Pattern Details:

Etsy Title Populated in Selling Channel:

In the case that your Pattern Name matches an existing pattern in your library, gosadi SMARTS! Will add the phrase “On Etsy” to the end of the Pattern Name to identify that you have more than one of the same pattern and this is the one on Etsy. This is a case where you want to Merge,

Updating Pattern Names in gosadi

When the Pattern Name field in gosadi isn't automatically populated from an Etsy import, you have the flexibility to either assign a new name to your pattern or match it to the Etsy listing.

option 1: assigning a new name

If you choose to give your pattern a new, unique name that differs from the Etsy listing:

Enter the new name in the Pattern Name field in the Pattern Details section and be sure to save your changes

You must also make sure that you are using a new name, and there is no pattern with that name in your library. Gosadi prevents multiple patterns with the same name, as aligned with our best practices.

option 2: matching to the etsy listing

To match the Pattern Name with what appears on Etsy:

  1. Use the Etsy Selling Channel Tab for reference.

  2. Manually update the Pattern Name in the Pattern Details section to match the Etsy title.

  3. Save & Continue

Final Thoughts

Managing your inventory effectively in gosadi, especially when importing from Etsy, revolves significantly around the accurate population and maintenance of the Pattern Name field. gosadi's SMARTS! technology plays a critical role in automating this process, ensuring that your patterns are accurately named and consistent with their Etsy listings. However, in instances where SMARTS! cannot make a match, the flexibility to manually update or assign new names to your patterns becomes essential.

Markdown: Get Your Listing layout the way you want

Markdown: Get Your Listing layout the way you want

Looking to enhance the appearance of your web content? Here's the good news, you don't have to be a web designer, coder, have deep technical knowledge or even know CSS/HTML to enhance your product pages on your gosadi DLP. We’ve got you covered!

Along with the ability to select your preferred theme and customize DLP themes in the future, we've integrated Markdown. Now, you can effortlessly add stylized text to your content, bringing your web pages to life with a touch of elegance and flair. Let's explore how Markdown can enhance your web content's appeal.

What is Markdown

Markdown is a simple, user-friendly way to format text on the web. It's been making styling text easy for nearly 20 years. Think of it as a personal assistant for your web content: you tell it how to style your text, and it does the rest. If you've ever used an asterisk (*) to italicize words in a message, you've used something similar to Markdown!

How Markdown works on gosadi

on your dlp

gosadi fully supports Markdown on patterns posted on your DLP. This means you can use Markdown to style and format your product descriptions, making them more visually appealing to your customers.

Markdown on Selling Channels


While gosadi DLP fully supports Markdown, it's essential to note that other selling channels may have varying text editing capabilities. Here's a quick overview:

ravelry

Markdown has been integrated with gosadi, keeping in mind its popularity on platforms like Ravelry. For those familiar with Markdown from Ravelry, this means a seamless experience on gosadi. Your product listings will maintain a consistent, professional appearance across both platforms.

etsy

On the other hand, some selling channels, including Etsy, have limitations on stylized text. When using gosadi for Etsy listings, you'll find that Markdown formatting options aren't available in the Selling Channel tab. This is due to Etsy's restrictions on text styling, so it's something to keep in mind when managing content across different platforms.

However, if these platforms ever decide to adopt Markdown or allow stylized text in the future, updating your content on gosadi will be a breeze. We are fully prepared to implement Markdown on any Selling Channel!

gosadi Markdown Editor Views

The gosadi Markdown editor currently defaults to the editor view, which means you will see the markup by default. However, you can easily switch between views:

editor view

By default, you'll see the Markdown markup in the editor.

preview view

Click on "Preview" to see a prettified version of your text.

 Important: This is the version that your customers will see, so always preview.

both editor and preview

Additionally, you can choose to see both the editor and preview versions of your text side by side, which can assist you in editing effectively.

How to Apply Markdown

Applying Markdown styles in gosadi is easy and user-friendly. Follow these steps to format your text:

  1. Highlight Text: Begin by selecting the text you want to format with Markdown. Simply click and drag your cursor to highlight the text.

  2. Click on a Markdown Icon: After highlighting the text, a Markdown icon toolbar will appear. Click on the specific Markdown style you want to add, such as bold, italic, underline, bullet list, or numbered list.

    For example, to make text bold, hover over the text, and click on the bold (B) icon in the Markdown toolbar.

  3. Preview Your Changes: After applying the Markdown style, you can click on the "Preview" button to see how your text will look with the applied style.

  4. Edit as Needed: If you want to make further changes or adjustments to your formatted text, simply click back on the text in the editor and reapply the Markdown style or edit the existing Markdown.

Adding Hyperlinks

Adding hyperlinks in Markdown involves a few more steps. Here's how to do it:

  1. Highlight Text: Highlight the text you want to turn into a hyperlink.

  2. Click on the Link Icon: Click on the link (chain link) icon.

  3. Review Link Text: The text that will be linked to the URL will now appear between brackets followed by parenthesis. 

  4. Enter URL: Enter or paste the full URL into the parenthesis you want the text to link to.

  5. Preview Your Link: To ensure your hyperlink works correctly, click on the "Preview" button to see the formatted link. You can also click on it in the preview to verify that it opens the intended web page.

  6. Edit or Remove Link: To edit or remove the hyperlink, update the URL 

Final Thoughts & Additional Resources

Markdown simplifies creating beautiful web content for everyone, technical or not. Don't worry if it's new to you; practice makes perfect! For more in-depth learning, check out this beginners guide to learn the basics or explore Markdown in more detail here. Happy styling!

Guide to Merging Patterns in gosadi

The great thing about gosadi is that it allows you to manage your online offerings from a central hub. No more jumping from one Selling Channel to the next, and this saves you time. But we also go a step further by not just giving you a pattern catalog hub, but also a way to manage patterns in your library in a single spot even though they are available on multiple channels. 

As a designer, you might often face the challenge of managing duplicate patterns when you import your designs from various selling channels into gosadi's Product Library. This support article will guide you through the process of merging these duplicates, ensuring your Product Library is organized and up-to-date.

Step 1: Identifying Duplicates

Initial Onboarding

When you first connect multiple Selling Channels (like Ravelry and Etsy) to gosadi, it's common to encounter duplicate patterns in your Product Library.

Initiating the Merge

  1. Navigate to the Product Library

  2. You will notice that gosadi detects duplicates and adds the extension (on Etsy, on Ravelry, etc) to let you quickly know you have that pattern in more than one location as well as identify which location that listing is for.

  3. Click on "Initiate Merge". gosadi will start processing your patterns to identify matches.

  4. Note: this may take a few minutes as gosadi SMARTS!™ runs.

Step 2: Accessing the Merge/Link Center

Finding the Merge/Link Center

After the processing, a new option labeled "MERGE / LINK CENTER" will appear under the Product Library section.

Understanding the Merge Screen

The Merge/Link Center is divided into two sections:

Top Section: Displays patterns matched with high probability.

Bottom Section: Shows patterns with lower probability matches.

Step 3: Selecting Patterns to Merge

Choosing Patterns That Match

Check the boxes next to the patterns you identify as the same but on different Selling Channels.

Initiating Merge

  1. Click on the "Merge" button to proceed.

Step 4: Resolving Conflicts Between Selling Channels

Review Conflicts

The next screen will present all the conflicts that exist between the different Selling Channels.

Making Selections

Carefully select the values that should remain post-merging. Remember, some fields like Gauge and Needle Size allow you to select multiple values and which is primary.

Selecting Primary Values

If you select multiple values for a field, you'll also need to designate a primary value.The primary value determines the display order, with the primary listed first.

Merging Your Descriptive Text

You have the option to select which of your stylized text you want to appear across your Selling Channels. If you select a Selling Channel text (in this case, Etsy or Ravelry) then THAT text will populate across the product level to all Selling Channels for that product.

Selecting Do Not Merge on Descriptive Text

When selecting a Descriptive Text value you have the option to “Do not merge”. This will allow each Selling Channel to maintain its pattern description. If you have a DLP gosadi SMARTS! will generate the description on your gosadi DLP tab.

Step 5: Previewing and Finalizing the Merge

This is your opportunity to tidy up your product listing and make final edits. It is the same as Housekeeping, but for the merged product. Make any final changes and tweaks to make sure your product listing is how you want it to look across all your connected Selling Channels.

Previewing the Merged Product & Performing Housekeeping

Click on "PREVIEW MERGED PRODUCT" to review the details of your merged patterns.

Reviewing Details

  1. Review Merged pattern: Take a moment to review each tab and verify the details. 

  2. Update details on each screen as you move through to finalize your listing

  3. Remove Duplicates: In the 'Files' and 'Gallery' tabs, you'll find duplicates because gosadi combines files and photos from both original patterns for completeness. We recommend removing any duplicates.

  4. Update Selling Channels: After removing duplicates, you may need to update one of the 'Selling Channels' tabs. This step is necessary because deleting duplicates might have removed files/photos linked to your Selling Channel. Re-add the final version of the pattern to ensure it syncs to your store.

Step 6: Confirming the Merge

Final Step

  1. Once you’re satisfied with the preview, navigate to "Merge Actions" and select "Confirm merge and create merged product."

  2. You will be asked to Confirm Merge & Sync.

    The reason you must sync when you confirm your merge is to ensure that all details are consistent and fully updated across your Selling Channels for that product.

Your patterns will be merged, and they will no longer appear as separate patterns in your Product Library.

You will also notice, on the new merged product, in your library that all Selling Channels appear for that product.

Final Thoughts

Merging patterns in gosadi is a straightforward process that ensures your Product Library remains organized and efficient. By following these steps, you can easily manage your designs and focus on your creative work. 

To explore all the features and benefits that gosadi has to offer, visit our website today!

Importing Pattern Files From Etsy

Maintaining an organized shop and ensuring your customers have access to the latest versions of your patterns is essential to your success as a designer, and gosadi is taking pattern management on Etsy to the next level! In this article we'll walk through the process of adding and syncing PDFs through gosadi for a seamless and efficient Etsy experience.

Understanding How Etsy Files are Managed on gosadi


You may notice that when viewing your pattern PDF in gosadi, it shows “File located on Etsy”, rather than the PDF itself. This is due to how Etsy manages files upon import.

When you import your patterns to gosadi from Etsy, the original PDF file remains in Etsy. Therefore, any updates or changes you make to the pattern within gosadi are independent of the original Etsy file. Your Etsy shop will continue to reference the original PDF until you sync a new file through gosadi. You can add any updates you want to the pattern and new pdfs through gosadi and the original file will remain on Etsy until you sync a new file through gosadi. 

Updating and Adding New PDFs

A benefit of gosadi is that it allows you to add updates and upload new PDFs to your patterns directly within the platform. You don't need to worry about manually managing files on Etsy. To manage your Etsy PDFs on gosadi:

  1. Navigate to the Product Library and select the pattern you want to update

  2. Click on the Files tab and upload or remove files

  3. Be sure to Click Save & Continue

Etsy Selling Channel Tab

When you add a PDF to an Etsy pattern in gosadi, you'll notice an option on the Etsy Selling Channel tab that allows you to decide whether or not to include that pattern in your Etsy Sync.

Here's what you need to know:

  • Any pattern included in the Etsy Selling Channel tab will be automatically included in your sync.

  • Only the files associated with the patterns on the Etsy Selling Channel tab will be synced with your Etsy shop.

Final Thoughts

Understanding how files are managed upon import and how to add, update, and sync PDFs  from gosadi to Etsy will help you maintain an organized shop, while also streamlining your file management process. 


To explore all the features and benefits that gosadi has to offer, visitour website today!

Housekeeping for Etsy Listings

Are you ready to optimize your Etsy shop and streamline your pattern management process? In this post, we’ll walk you through the Housekeeping process for your patterns on Etsy while using gosadi. We'll explore the various fields in Etsy and how they relate to product information tabs in gosadi. Whether you're new to gosadi or looking to enhance your pattern management skills, this article has got you covered.

Getting Started With gosadi

If you are new to gosadi, we recommend checking out the following articles to get started:

Connecting and Importing from Selling Channels

Introduction to Housekeeping

Understanding Your Etsy Pattern Details in gosadi

While gosadi SMARTS!™ simplifies the process of importing your pattern details from Etsy, it is not a one to one matching system. This means that we’ll catch a lot of your pattern details from Etsy and bring them into gosadi, but because Etsy uses data differently than other Selling Channels such as Ravelry, you will have a wee bit of Housekeeping to do for your patterns.

Patterns from Multiple Channels

If you have imported patterns from various Selling Channels, like Ravelry and Etsy, and they share the same name, gosadi SMARTS!™ automatically adds "on Etsy" to the pattern imported from Etsy. This helps you distinguish between the two, making it easier to update and manage them through gosadi. You can also merge them into a single product with the magic of gosadi SMARTS!™, but more on that in a future post.

Etsy Files and Updates

You may notice that your pattern displays as "On Etsy" rather than as a PDF within gosadi. This is due to how Etsy manages files upon import. The good news is that you can add any updates you want to your pattern and upload new PDFs directly through gosadi. Your original file will remain on Etsy until you sync a new file through gosadi. There's no need for immediate action here unless you have files to update. When you eventually merge patterns, you'll see how gosadi seamlessly ties your files together across all platforms.

Optimizing Your Etsy SEO Tags

In addition to simplifying pattern management, gosadi SMARTS!™ offers a head start on optimizing your Etsy Selling Channels tab. It provides suggested words and phrases for Etsy SEO (or EtsyO as we call it) tags, making it easier to improve the discoverability of your patterns on Etsy.

Final Thoughts

Managing your patterns on Etsy with gosadi can greatly enhance your efficiency as a designer and seller. While there may be some Housekeeping tasks involved, the benefits of centralized pattern management and SEO optimization are well worth the effort. Whether you're a seasoned seller or just starting out, gosadi is here to simplify your Etsy experience. Happy pattern Management!


To explore all the features and benefits that gosadi has to offer, visitour website today!

Hiding Your Test Listing on gosadi

As you begin your Etsy journey and become more acquainted with managing your listings using gosadi, you might decide that you want to hide some of your listings from the public. We completely understand this need, and in this article, we'll guide you through some straightforward steps to help make sure you are always in control of how your work and brand are presented to the public..

Whether you're seeking to maintain a level of exclusivity or just organizing your inventory, we've got you covered. Let’s dive into hiding your listings from the public view.

Step 1: Access Your Etsy Account

To begin, log in to your Etsy account, and navigate to your listing manager. This is where you will have full control over your listings.

Step 2: Review Your Listings

Within the listing manager, you can review the status of all your listings on a single page. 

Step 3: Choose the Listing to Hide

Locate the specific listing you wish to hide from public view. Once you've identified it, select the dropdown menu situated next to the gear wheel icon. You'll find two options at your disposal:

Deactivate the Listing: This choice allows you to hide the listing from public view while preserving its content for potential future editing or reactivation. It's an excellent option if you plan to bring the listing back later.

Delete the Listing: Alternatively, if you no longer wish to keep the listing in your shop, you can choose to delete it entirely. This option removes the listing from your inventory.

Step 4: Make Your Selection

Choose the option that aligns with your needs, whether it's temporarily deactivating your listing or deleting it entirely. 

Final Thoughts

As you continue your journey on Etsy, remember that flexibility and customization are keys to success while building your brand. By utilizing gosadi you are in full control of your listing management process.

To explore all the features and benefits that gosadi has to offer, visitour website today!

How to Create an Etsy Shop With gosadi

With the power of gosadi, it is now easier than ever to open an Etsy shop and thrive! Once you follow the steps to opening your shop, you can seamlessly bring your pattern library to your Etsy store.

We estimate, if you have all the things ready as listed below that this process takes an average of 45 minutes.

Registering for an Etsy Shop

To open an Etsy shop through gosadi: 

1. Go to Manage Connections and select to connect Etsy. 

2. Select register for an Etsy Shop. This will take you to Etsy where you must first create an account.

3. Once you have created your account and verified your email, go to the account icon on the top right page on Etsy and select Sell On Etsy.

It is good to have an idea of what you would like to call yourself on Etsy for when your shop is set up. While you can change it later, establishing your brand straight away is extremely advantageous as Etsy often gives added visibility to new shops. 

Here’s a list of things you will need to have on hand to expedite the process:

  • Your legal name

  • Business Name

  • EIN or SS #

  • mailing address

  • home address

  • have your first pattern - etsy requires you to create your first listing in the set up process. (don’t worry, you can manage your patterns through gosadi after initial set up)

  • At least 3 photos for the pattern ready to upload

  • banking information for etsy payments

  • billing details - we suggest a credit card but you can also use your bank or PayPal

4. Follow the prompts on Etsy to set up your account. 

NICE WORK! Now set up a listing!

Once you have completed the initial account set up, the next step is to create your first product listing. Even if you are using gosadi, Etsy requires your first listing to be made ON Etsy - which you can later manage through gosadi as well.

Using a pattern that you have ready, create your first listing. Etsy lays out the process for your listing creation page but here are some tips on the Etsy Open a Shop Guide.

Remember, you can always come back later and make changes and update this pattern through gosadi. This is just the first listing required to complete the shop set up.

Final Steps 

Finalize Payment and Shop Setup

With your first listing in place, proceed to finalize your payment and shop setup. This is a significant milestone that marks your official journey as an Etsy seller!

Managing Your Listings

If you’d  like to temporarily hide the listing you just created, you can easily manage this through your  listing management. options. Etsy provides flexibility to adapt your shop to your evolving needs.

Etsy Best Practices

To ensure your Etsy shop flourishes, we highly recommend taking some time later to familiarize yourself with best practices for new shops. You can find valuable insights and guidance in Etsy's dedicated resource for new sellers. Understanding and implementing these guidelines will help you maximize your shop's potential and ensure a successful start to your Etsy journey.

Potential Blockers

While setting up your Etsy shop, you have the option to establish it as either an incorporated business (e.g., LLC) or a sole proprietorship. It's important to set up your store in the way that you will operate it and reflect your tax reporting. It is also essential to add accurate information. Even then, it is important to understand the possible implications of this selection. 

If you opt for an incorporated business setup (which you would do if you are operating as a company, LLC or any other incorporated entity), even with all of your documents, you may encounter certain blockers that Etsy will require additional verifications. If this happens, you will get notified from Etsy that your shop is placed on “vacation mode” while these verifications are completed. In this case, on vacation mode, Etsy will restrict your Etsy shop's visibility to anyone but yourself.

Addressing Alerts and Potential Blockers

After creating your shop, you might notice a number alert on your Shop Manager. This alert signifies that there are fields or documents that require your attention and completion. These could include business registration, tax certificates, or personal identification documents such as your driver's license.

To resolve these issues:

1. Click on the alert next to your Shop Manager icon.

2. On the Shop Manager page, you'll see an alert banner with the option to 'Get Started.' Clicking on this will take you directly to the fields that need your attention.

3. Be prepared to upload the necessary documentation as instructed. It's crucial to provide complete documents to expedite the verification process. For example, if your driver's license is requested, upload a single file containing images of both the front and back of your license.

As we mentioned earlier, it's vital to address these alerts promptly during your Etsy shop's creation because your shop will enter Vacation Mode until all issues are resolved.

At this time, you won't be able to import or edit your Etsy account in gosadi when your shop is on Vacation Mode.

Now that you've completed these crucial steps and are aware of potential blockers, you're well on your way to achieving success as an Etsy seller, using gosadi.


To explore all the features and benefits that gosadi has to offer, visit our website today! We're here to support you on your Etsy journey. Happy Selling!

Creating a New Product

As a designer, showcasing your creations on various Selling Channels can significantly boost your visibility, brand awareness and sales. While importing patterns is a great start, creating new products in your gosadi Product Library opens up even more opportunities to be efficient and reach bigger audiences. In this article, we'll guide you through the process of creating a new product on gosadi, from choosing your craft type to publishing it on your desired Selling Channel. Additionally, we'll explore how you can easily manage multiple Selling Channels from a single gosadi listing set up.

How do I create a new product?

To begin creating a new product on gosadi, follow these steps. Remember to click “SAVE & CONTINUE” as you move from one page to the next:

Step 1: Access "Manage Product" and Click "Create Product"

Log in to your gosadi account, navigate to "Manage Product," and click "Create Product" to start the product creation process.

Step 2: Choose Your Craft Type

Select the appropriate craft type that best represents your product. This forms the foundation for your creation.

Step 3: Fill Out Pattern Details

In the Pattern Details tab, provide essential information about your pattern, including Pattern Name, Pattern Level, Published Month & Year, and identifying where your pattern is published, this includes identifying available Selling Channels. Lastly, complete the "More Info URL" field to add a link with additional details. 

Step 4: Define Categories and Subcategories

Help potential buyers find your product easily by accurately defining the categories and subcategories that best describe your pattern. You may add multiple categories and enter custom sub categories.

Depending on what Selling Channels you connect to, this can be a powerful way to get found by people looking for patterns.

Step 5: Provide Detailed Information

In the Nitty Gritty tab, offer precise details about your pattern, such as yarn weight and hook size. Fill out the Size Information box with appropriate dimensions.

Step 6: Add Attributes

Use the Attributes tab to search the attributes picklist and add relevant characteristics and sub-attributes. 

Step 7: Add Languages

Specify the languages in which your pattern is available.

Step 8: Showcase Your Product with Images

In the Photo Gallery tab, upload clear, well-lit images that accurately represent your product. High-quality images enhance the appeal to potential buyers. Add Captions/ Alt text to enhance your customer experience.

Step 9: Upload Necessary Files

Use the Files tab to upload essential files for your pattern, such as PDFs or any other related materials.

Step 10: Utilize Descriptive Text  (Optional)

The Descriptive Text tab allows you to include extra information or notes about your pattern, offering additional context for potential buyers.

Step 11: Choose Your Selling Channel

In the Selling Channels tab, select your desired Selling Channel and verify all pattern information before proceeding.

At the bottom of the gosadi DLP tab marke the pattern as “Visible on DLP” or “Hide on DLP” to determine if the product will appear on your public facing gosadi page.

Save or Publish Your Product

Once you have completed all the necessary fields, choose to either save your work as a draft or publish it directly to your chosen Selling Channel. Saving as a draft allows you to revisit and make changes before making it public.

How do I access my drafts

Click “Manage Product” and select “Product Library”, then click “Drafts” to see all products that were saved but not  published to your DLP.

Can I Edit My Product Details After Publishing It?

Yes! You can edit your product details even after it has been published. To do so, go to "Manage Product" > "Product Library" and select the product you want to edit. Make the necessary changes and save them to update your product's information. Remember to “Save & Publish” your edits when you're ready for your customers to see the changes.

Can I Manage Multiple Selling Channels Through My gosadi Account

Absolutely! gosadi allows you to manage multiple Selling Channels, such as Ravelry, Etsy, and others, from a single account. You’re able to edit a single product and push updates to each Selling Channel in isolation. This feature streamlines product and sales management across different platforms, saving you time and effort.

Final Thoughts

Creating and managing products on gosadi is a powerful tool to grow your crafting business. By following the steps outlined in this guide, you can effectively showcase your patterns and reach a broader audience through various Selling Channels. Don't hesitate to leverage the convenience of gosadi to take your crafting journey to new heights!


To explore all the features and benefits that gosadi has to offer, visit our website today!

Refreshing Etsy Listings

In order for gosadi to operate within Etsy's ecosystem, adherence to Etsy's API commercial requirements is essential. These requirements are designed to maintain the integrity of Etsy's data, safeguard user privacy, and foster a fair relationship between gosadi and Etsy. In this blog post, we'll emphasize the importance of regularly refreshing your data on gosadi and provide a comprehensive guide on how to do so.

Refreshing Your Etsy Shop Data on gosadi

Every 6 hours that your products remain unedited, they are considered "stale" in accordance with Etsy API terms, prompting the need for a refresh. We've made this process incredibly easy for you so you can effortlessly keep your product information up to date.

If the last sync is more than 6 hours ago, a message at the top of the Product Library screen will prompt you to refresh your Etsy data. Click the Refresh button to initiate a refresh and re-import from Etsy.

Why Is a Refresh Needed

Whether you've made edits to your products or not, numerous variables within Etsy's ecosystem might render your pattern details stale or outdated. Here's why a refresh is essential:

Data Accuracy

Etsy's inventory and shop data undergo frequent changes due to factors like sales, updates, and new listings and other behind the scenes activities. Refreshing your data ensures that the information on gosadi accurately reflects the current state of your Etsy shop.

Compliance

As part of our commitment to complying with Etsy's API commercial requirements, we must maintain up-to-date data for your shop. This commitment ensures a consistent and reliable experience for both gosadi and Etsy users.

System Efficiency

Regular data refreshes enhance the efficiency and responsiveness of our system, ensuring a seamless experience for all gosadi users.

I've Made No Changes, Why Is My Data Considered Stale

Per Etsy API terms, your data is always considered "stale" after 6 hours and requires a refresh. This practice guarantees that you work with the most current and accurate information. Factors that can affect your shop's data include:

Other Sellers

Changes in other shops might indirectly impact how your shop data is presented.

Listing Updates

Updates to listings similar to yours can influence your shop's visibility or relevance.

By prompting you to refresh your data, we ensure that you’re maintaining the latest information in gosadi, while keeping our platform compliant with Etsy's requirements.

Where did all my Etsy listings go

To remain compliant with Etsy API policies, gosadi will “hide” your Etsy patterns until you fresh your data.

Final Thoughts

Regularly refreshing your Etsy shop data on gosadi is more than a requirement; it's a crucial step to stay informed and maintain accuracy. Our 1-click Refresh solution takes a proactive approach to adhering to Etsy's guidelines.

To explore all the features and benefits that gosadi has to offer, visit our website today!

How Alt Text Works On gosadi

Alt text, also known as "alternative text," plays a crucial role in making your online content accessible to everyone, especially those using screen readers and assistive technologies. Alt text is a feature that can greatly benefit users who are visually impaired or use screen readers to access the internet. In this post, we will discuss how alt text works on gosadi and how to use it effectively.

How does Alt text work on gosadi?

gosadi provides an alt text field named “Caption” under each individual picture in the Gallery tab. 

Since some Selling Channels support captions and some support Alt Text, we have found that combining them allows gosadi users to make sure all photos follow best practices. 

Are Alt text imported from Etsy?

Alt text will auto-populate with information gathered during the Housekeeping process if you have done an import from Etsy. Etsy uses either your Pattern Title or text you have added as alt text and this is automatically imported to gosadi.

When you create a new pattern using gosadi and publish TO Etsy, if you do not add specific Alt text then Etsy will automatically populate it with the Pattern Title.

Are Alt text imported from Ravelry?

Alt text will remain blank if you have imported from Ravelry. But the great news is that it will export TO Ravelry if you make changes in gosadi.

How do I enter/edit Alt text? 

1. Click on "Manage Product" and select "Product Library" to edit an existing product or “Create Product” to add a new one.

2. Go to the Gallery tab and click “Edit Details” for an existing product or upload a new image.

If the “Caption” field is already populated with information gathered during the import process, you can edit it if necessary. If it is blank, this is a great opportunity to add your alt text.

Include any relevant details that would help someone understand the content of the picture. Check out Alt Text Best Practices for more information.


Remember to save your updates by clicking  “SAVE & CONTINUE”.

Final thoughts

Making your online content inclusive and accessible to all users is a responsibility that benefits everyone. By incorporating well-crafted alt text on Gosadi, you contribute to a more inclusive internet, ensuring that individuals with visual impairments or using assistive technologies can fully engage with your content.

Remember, alt text is not just a compliance requirement; it is a way to demonstrate empathy and respect for all users, regardless of their abilities. By embracing accessibility best practices, you foster a more diverse and welcoming online community. So, let's make the web a better place for everyone, one alt text at a time!

To explore all the features and benefits that Gosadi has to offer, visit our website today!

gosadi Levels

Oftentimes, designers are asked about the skill level of their products. How many times has someone said, “I’m new, I can not make that”? Then we, the designer, give them encouragement to make it by showing them the stitches they need to learn. As a designer, one thing we want to communicate to makers of our patterns, and our customers, is how they can achieve the look as it was designed.

At gosadi, we have broken down pattern levels to help designers communicate to customers what skills are necessary to achieve the design look. You can link to this page in your product listings and use it as a guide for your customers.

You will also find Skill Level in your pattern listing details screen. gosadi requires Skill Levels for listings as it enables users to search for patterns based on their Skill Level and easily identify which of your patterns are a good fit for them.

The Craft Yarn Council guide on Skill Level is an excellent place to start, but we wanted to dive deeper to create a complete Guide to Skill Level that covers all of your potential customer questions!

Why Add A Skill Level

While adding a Skill Level is helpful for your customers (it’s also key for good SEO), we consider it to be best practice to list the Skill Level and stitches required for your pattern in the pattern listing itself. This will ensure that your customer knows what they need to know to achieve the look of the pattern, or what they need to learn.

I think it’s super interesting to note that pattern Skill Levels describe the project itself, not necessarily the current Skill Level of the stitcher. Your Skill Level doesn’t have to dictate the projects you can (or should) attempt. It just helps determine whether making an item would be a chance to relax or an opportunity to grow in your stitching” - Bethany Henderson, Fig & Filament, gosadi alpha tester

Skill Levels on gosadi

BEGINNER

As a beginner, you are just starting out in your craft journey. Beginners would be able to create simple projects with repetitive stitch patterns like scarves, dishcloths, or basic granny squares in crochet and hats that are made flat. A beginner is still learning basic stitches, tension, fundamental tools, materials and techniques of the craft.

BEGINNER KNIT STITCHES
co
knit
purl
bind off
stockinette
garter

BEGINNER CROCHET STITCHES
chain stitch
single crochet
double crochet
slip stitch


EASY

Easy is for those somewhere between Beginner & Advanced Beginner. The pattern or project itself is easy and a great way for a Beginner to challenge themselves to the next level. It also implies any project that has repeats or is great for skill building.

ADVANCED BEGINNER

An advanced beginner has a bigger stitch library and is more familiar with various tools and fibers. An advanced beginner can follow simple stitch and row patterns. They understand specialty stitches and techniques like magic circle in crochet and can achieve simple color changes. They also have the ability to read a chart in a pattern and understand the stitches required.

Moreover, an advanced beginner is capable of achieving simple increase and decrease shaping and finishing, as well as basic stitch patterns in the round.

INTERMEDIATE

The intermediate level is for someone who’s got the basics down and is ready for something more challenging. This level has skills reading a pattern, schematics and chart. This level often includes more complex stitch and row patterns, a variety of specialty stitches and techniques, more advanced colorwork (stranded or intarsia) and mid-level shaping and finishing with either simple seam or join, or 3 needle bind off in knitting. An intermediate level can also achieve basic cables in both knit and crochet. Additionally techniques include picking up stitches, button holes and edging.

INTERMEDIATE CROCHET  STITCHES

chain stitch
single crochet
Half double crochet
double crochet
Treble crochet
slip stitch
Front loop stitches
Back loop stitches
fsc
fhdc
fdc
Decorative stitches

INTERMEDIATE KNIT  STITCHES

co  using various cast on methods (tubular, german cast on, etc.
knit
purl
bind off using a variety of methods
stockinette
garter
front loop stitches
back loop stitches
YO

ADVENTUROUS

Adventurous is actually our favorite level! You are an enthusiastic fiber arts lover and always stretching your skills to learn more. Adventurous level is for those somewhere between Intermediate & Advanced. You are adding to your toolbox of techniques and skills and up for a challenge.

Projects may include intricate stitch patterns, techniques and various shapes & dimensions; non-repeating patterns, multi-colored techniques, fine threads, small hooks and a variety of trim and accents.

ADVANCED

The Advanced level is for someone who is quite skilled in their craft. You have a toolbox full of stitches and techniques, and the understanding of how to incorporate multiple techniques into a single project.

Projects have detailed shaping and refined finishings with multiple seams or joins, which you can achieve with ease. Projects could be multi-piece garments or a fair isle sweater with multiple specialty stitches, techniques and intricate colorwork.

For knitting, you’ll be able to dive into techniques like advanced texture patterns, advanced lace finishing techniques, multicolor knitting, intricate cables, working a charted pattern without words and complicated charts (either for cables, lacework, or colorwork). Additionally, you’ll have mastered sewing in a zipper, double knitting and / or brioche knitting, as well as other advanced texture patterns.

ADVANCED CROCHET  STITCHES

chain stitch
single crochet
Half double crochet
double crochet
Treble crochet
slip stitch
Front loop stitches
Back loop stitches
fsc
fhdc
fdc
Decorative stitches
floating cables
herringbone hdc
custom stitches

ADVANCED KNIT  STITCHES

co  using various cast on methods (tubular, german cast on, etc.
knit
purl
bind off using a variety of methods
stockinette
garter
front loop stitches
back loop stitches
YO
Short rows
I-cord
simple double knitting
German Short Rows
brioche stitches

Final Thoughts

Choosing the right skill level is the key to creating returning customers. Mislabeling a pattern as "beginner" when it's actually at the "advanced beginner" level might lead to frustration for inexperienced creators who aren't prepared for the challenge. Setting up clear expectations from the beginning is the key to creating a successful pattern release, not only for your current pattern, but for all patterns to come!


Archiving Patterns

As a designer, it's important to have a centralized platform that simplifies the management of your designs and streamlines the process of connecting with your Selling Channels. In this post, we’ll focus on the Archive feature and explore its benefits in maintaining the integrity of your pattern inventory.

Read More

Hiding Patterns From Your Front Facing DLP

As a designer, it's crucial to have control over how your brand is represented on your Designer Landing Page (DLP). This is where gosadi comes in, offering a powerful platform that allows you to seamlessly connect your Selling Channels and manage your pattern inventory to a single location accessible to your customers. In this blog post, we will explore one of the valuable features provided by gosadi - the Hide on DLP  feature. Let's dive into how the Hide on DLP feature empowers you to curate and present your works effectively.

Read More

What is a Designer Landing Page (DLP)?

Follow this guide to learn how to navigate your Photo Gallery and manage your Selling Channel Photos. We’ll help you display your Products in the best possible light while protecting your brand from potential copyright infringements.

Read More

Managing Your Product Photos

Follow this guide to learn how to navigate your Photo Gallery and manage your Selling Channel Photos. We’ll help you display your Products in the best possible light while protecting your brand from potential copyright infringements.

Read More